ART GALLERY WREN FLOWERS TOSS 2.0
TEHACHAPI LOOP SAND SCULPTURE CONTACT COLOPHON
Toss 2.0

Lester "Lee" Dronick
This is not an example of Toss Photography
They don’t invent
They don’t imagine
They don’t heal.
They don’t explore
They don’t create
They don’t inspire
They retard progress of society
Maybe they have to be boring and unimaginative. How else can you stare at an empty canvas and see nothing whatsoever? Or sit in silence and hear nothing at all? Or gaze at a red planet and not even see it? While some see them as the dull ones, we see criminals. Because the people who are uninspired enough to think they can never change a thing, are the ones who hold us all back.
Toss Photography - Among other artistic interests that I have been dabbling in is toss photography. This is a technique of tossing and spinning a camera to create interesting blurs and streaks of lights. Most photographers seem to be doing this using slow shutter speeds, but I took these using an iPhone 3GS which does not have any camera controls. From what I understand these distorted images are a result of the relatively simple camera and the CPU that processes them. Not that the iPhone doesn't take good photos, it takes excellent ones for being designed as a snapshot camera.
I started doing this by accident. Well not that I stumbled upon the technique by accident, I had heard it some time ago, but never tried it. What happened was that I was taking some photos of reflections in a fountain when I accidentally blurred one as I was moving around the fountain to find a different composition. Unlike most cameras that take a photo when you press the shutter, the iPhone takes it when you release the button. Apparently I took my finger off of the shutter button as I was moving the iPhone. The resulting image wasn't bad as blurs go, kind of surreal looking, but it got me interested trying to do it on purpose. When I got home I did a web search on toss photography and decided to give it a try. I went out to the back yard to give it a try. The back yard has a nice soft lawn so that if I didn't catch the camera after tossing it in the air at least it would land on a cushiond surface.
The image at the top of the column on the right was the first one I took and wow, what an interesting photo! I tried some more, some were keepers and some were not. What I discovered was that if I didn't move the iPhone fast enough the image was simply blurred. However, if I moved it rapidly then I got these interesting distortions.
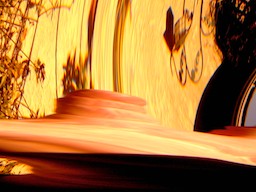
The top photo is the back wall of our house. It was taken with camera upside down as evidenced by the lantern in the upper right third of the photo. However, I like the look of it better so I am displaying it that way. To the right you can see some blue gray color, that is the sky. I have no idea what is that thing is across the bottom half of the photo, it may very well be a terra-cotta plant pot.
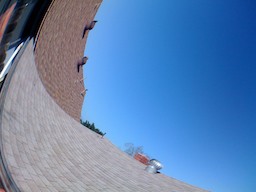
The second photo was also taken in our backyard. The roof of our house and our neighbor's house.
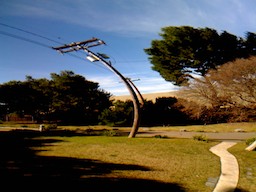
The third photo was not a toss in the air, but I swung my arm in a horizontal arc.
Some tips if you want to try this with your iPhone.
1. Do it on a soft surface so if you drop your iPhone the risk of damage is reduced.
2. Have your iPhone in a good case. Again this is to help reduce the risk of damage should the iPhone hit the deck.
3. Get ready to toss. Hold the shutter button, release it as you toss the iPhone into the air.
4. Catch the iPhone before it hits the ground.
5. Be prepared to wait a bit before seeing your photo. This technique seems to take a lot of processing power and it may be a minute or so before it finishes.
6. You will probably need take quite a few photos before you find any that work and that are any good.
7. As I mentioned previously you can also hold onto the iPhone, tightly, and swing your arm.
8. I have a self-portrait app on my iPhone that has a 3 second timer. What I did during some of these sessions was to start the timer and toss when it reached 1 second.
You are trying this at your own risk. If you mess up your iPhone, smash it or whatever, then that is all on you. In other words don't come crying to me if you mess up.
I hope that you enjoyed this exhibit. As soon as possible I will add some links to the photos so that you can view a larger version.
Lester "Lee" Dronick, artist

All items on this website are Copyright © 2008 by Lester Lee Dronick or others, all rights reserved
Your computer's location: 216.73.216.48